by Corey Morgan | Sep 22, 2022 | Exterior Painting, Pro Tips
What You Should Know About Staining in the Fall
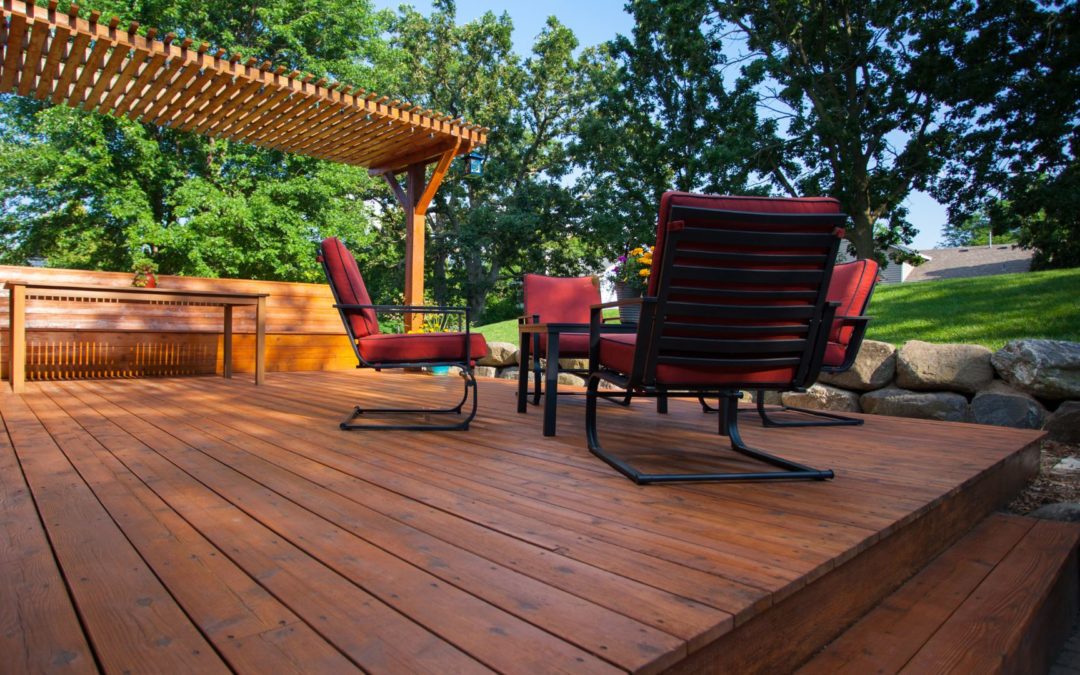
As summer cools down and fall weather approaches, the window of opportunity to take care of exterior painting or staining projects is closing. That window tends to close a little quicker for stains.
There are a few variables that can greatly impact the success of a stain project. Weather must be in your favor to complete any stain project. Stains are fairly reliant upon the correct temperature range and dry weather in order to cure properly. The type of stain can also play a role due to different temperature thresholds that are required for a stain to adhere and cure properly. This time of year is your last chance to complete that stain project before winter arrives! Keep reading to learn more about what you should know about staining in the fall.
Solid Stains Vs Semi-Transparent Stains
Semi-transparent stain
Stains provide an appealing look, but they also protect exposed surfaces. Typically, homeowners will stain decks, fences, pergolas, or the whole exterior of a home. The first thing you must know when approaching a stain project is what type of stain you are going to use. The two main types of stains most often used are solid stains and semi-transparent stains.
Semi-Transparent Stains
Semi-Transparent stains are likely what you think of when you think of stains. Semi-transparent stains preserve the natural wood grain while creating an appealing aesthetic. The wood grain will still be visible through a semi-transparent stain while adding an additional pop of color.
Semi-transparent stains are made to penetrate wood surfaces and bind with wood fibers. This helps to protect the wood and preserve it for longer. For that reason, it is typically better to use a semi-transparent stain on surfaces you may want to preserve for longer, such as your deck.
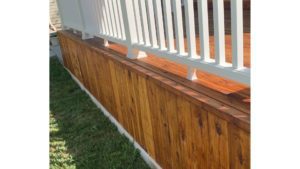
Solid Stains
It’s important to understand what you’d like out of the look of your stain. Solid stains are more similar to paint and will cover the natural wood grain. If you want the wood grain to still show, a semi-transparent stain might be better suited for your project. Solid stains do not penetrate the wood or bind with the wood fibers. Instead, a solid stain lays upon the wood surface more like a top-coat of paint. Check out the image below of a solid stain project.
Solid stain deck
You can see how dark and thick the stain looks in comparison to a semi-transparent stain. Solid stains are a more stylistic choice when it comes to stains. When done right, a nice solid stain can really elevate your outdoor space by adding to the overall aesthetic while matching nicely with your exterior paint.
Weather & Temperatures Impact on Stains
Weather and the temperature of your environment are crucial factors when completing a stain project. Each type of stain has a temperature range required to apply the product and allow proper curing. You should always refer to the manufacturer’s guidelines when applying a stain. Same goes for paint, but stains can be a bit more finicky!
Temperature Threshold
For both semi-transparent and solid stains the ideal range is between 50-90 degrees fahrenheit. If it is too cold, or there is rain/snow within the first 24 hours of applying a stain product, it will not adhere or cure properly. If it is too cold or too hot when applying a stain it can create spotty results and will be cumbersome to fix.
As mentioned before, solid stains are more similar to paints in their chemistry. For that reason, they have a wider temperature range that they can safely be applied. For a solid stain you can typically apply them all the way down to 35 degrees fahrenheit. Semi-transparent stains have a tighter window and you really should fall within that 50-90 degree temperature range.
We need to keep in mind that it may be a nice fall day around 70-80 degrees out, but once that sun falls, the temperatures drop. Your painter should be aware of the temperature drop at night. If the temperature drops below that 50 degree mark at night, your stain may not cure properly. This can be especially true here in Colorado where we can have quick temperature swings.
For this example we are using Sherwin Williams SuperDeck Exterior Deck Stain (Semi-Transparent & Solid).
Location Matters
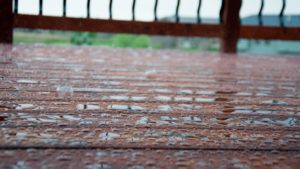
How well your stain adheres to your surface can even be impacted by the location of what you plan to stain. For example, if you have a ground-level deck that’s located on a side of your home that receives less sunlight it won’t receive as much heat being in the shade.
During the fall, a shaded area may struggle to reach the ambient temperature that a stain requires. This will create a longer dry time and could increase the risk of your stain being impacted by moisture.
Conclusion
It’s vital that your painter is well aware of the proper temperature threshold that your stain requires for application. If it is too cold, your stain project will not adhere or cure properly. It’s always better to play it safe when applying stains! You can typically apply solid stains later in the year due to their wider temperature range. We recommend waiting for the proper weather to complete a stain project as opposed to rushing your project. If you have a stain project you’d like to get completed, Kind Home Painting Co. provides free estimates. For inspiration, be sure to check out our Instagram page HERE.

by Corey Morgan | Sep 8, 2022 | Exterior Painting, Paint Color Help, Pro Tips
What you should know about HOAs & Paint Colors
What To Know About HOAs
As a Denver painter that handles projects in neighborhoods throughout the entire metro area, we deal with a lot of HOAs (Home Owner Associations). If you are considering painting your home, one of the first things you need to know is if you have an HOA. If you do, it is vital that you have an idea of what it’s like to work with your HOA. Depending on the HOA, getting HOA approval for your desired colors can take some time. Certain HOAs can be fairly strict, so it is important to plan ahead of time if you want to get your project completed in a timely manner. Keep reading to learn more about HOAs and what you can expect when getting your paint colors approved.
How long does HOA color approval take?
We get this question asked all the time: how long does HOA approval take? This can be a tricky question to answer. Every HOA is different. Some HOAs have very quick turnaround times for color approval while others can take months. It really depends on the size of your HOA and how they handle inquiries for different projects. We always suggest that you figure out the color schemes that your HOA approves of before beginning your color selection process.
One of our favorite HOAs to work with is HRCA, Highlands Ranch HOA. They are very responsive and will get colors approved in no time at all. They are also fairly flexible with their residents’ color choices. This allows their homeowners to exercise a little more creativity and control over their color options.
An HOA that a recent client struggled to get color approval from was West Gold Meadows HOA. This particular HOA is located in Castle Rock, CO. This client had their colors denied twice and took roughly 7 weeks to get approval. We aren’t throwing shade at West Gold! But we wanted to include a real example from a local HOA. In our experience, there are a lot of HOAs that can be a bit more strict on colors and may have a longer turnaround time similar to West Gold. This can be due to staffing issues and the type of homes that make up the neighborhood.

How do I find my HOA colors?
Homeowners can sometimes struggle to even locate their HOA online, let alone figure out how to best submit colors. Finding your HOA approved color schemes can be a challenge sometimes. For some HOAs you may be able to find their pre-approved colors at Sherwin Williams. Sherwin tends to keep HOA colors on file for clients, but that isn’t the case for every HOA.
You can typically find your HOA online if you do a simple search for your neighborhood, city or county, plus the keyword “HOA”. From your HOA website you may need to register with your HOA if you have yet to do so. After that you should be able to submit a request through the resident portal. Or you may need to email them for color approval. The process may be a little different for each HOA, but should be fairly simple. When submitting your colors be sure to include the paint color name and paint code.
Be sure to check out our previous blogs about some specific HOAs and our favorite approved colors:
5 HOA friendly colors
Our favorite Highland Ranch HOA color schemes
Broomfield’s most HOA friendly colors
Top 10 Tallyn’s Reach color schemes
How to submit colors to HRCA
Why do HOAs deny colors?
Some HOAs can be more strict than others. Your HOA may deny colors if they don’t fall under their specified guidelines for what they allow. This is because HOAs often have desired color schemes to create a cohesive look throughout the neighborhood. It also helps them to exercise a little control over the look and feel of the homes. You should be able to find your HOAs approved colors on their website. This is a good place to start when selecting colors.

Can my painter help with HOA approval?
Your painter may be able to help find your HOA online or they may have knowledge of your specific HOA and the color schemes that they approve. However, you will need to personally submit to your HOA for color approval; your painter won’t be able to do this for you.
Your painter may be able to suggest some fairly HOA safe colors schemes as well to get you started in the right direction.
What about a color consultant?
Professional color consultants are extremely knowledgeable about color schemes that work for HOAs. If you are struggling at all with your color selection, we always suggest getting some insight from a certified color consultant. They will help you easily narrow down colors and find the perfect fit for your home, your preferences and your HOA requirements.
Check out our Color Consultation page to learn more about our color consultation services.
And if you are ready to get some pricing for your paint project, you can easily request a quote HERE. Thanks for reading! We hope this answered some of your questions about Home Owner Associations and getting color approval for your paint project.


by Corey Morgan | Jul 22, 2022 | Interior Painting, Paint Prep, Pro Tips
The Best Interior Paint Warranty in Denver
At Kind Home Painting Company we always strive to improve the client experience. It is the driving force behind all we do. We know painting your home is no small feat and it can be an investment of both your time and money. That’s why we want to make sure you feel taken care of even long after we’ve completed your project. With that being said, we have upgraded our interior warranty options for our clients.
Prior to this upgrade we only warrantied interiors for one year. Even a one year interior warranty in our industry is pretty rare. But, as one of the best painting companies in Denver, we believe it is our responsibility to do what is right for our clients and lead by example. That’s why we’ve added up to 3 Years to our Interior warranty. Ultimately, we aren’t warranting just a paint job, but a relationship with you.
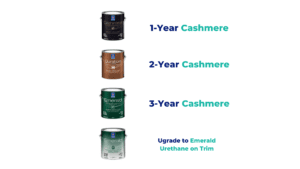
Interior Warranty Options
Our new interior paint warranties options for our clients across the Denver metro are as follows:
1 Year Warranty – Sherwin Williams Cashmere
2 Year Warranty – Sherwin Williams Duration
3 Year Warranty – Sherwin Williams Emerald
We have a commitment to only using the highest quality paint products on the market and each of these paint products are Sherwin Williams top-tier interior paints. While you can choose from other paints, these are the only paints that we warranty because we stand behind their quality. Each of these paints are specifically designed for premiere interior painting. They each have their own unique properties that help them stand apart from other paint products.
Contains a silky, low-stipple appearance. It is a paint and primer in one and has a smooth, buttery application.
Ideal for high-traffic residential spaces because it cleans easily and has great durability, especially in moist environments like a bathroom. It also has properties that help it to retain color and have a less visible shine after washing.
Sherwin’s best interior paint. It will provide your walls with exceptional coverage, durability and washability. It is also a paint and primer in one with stain blocking technology to provide you with added protection from wear and tear. Last, but not least, it contains antimicrobial agents that inhibit the growth of mold and mildew.
You can also upgrade Sherwin Williams Emerald Urethane Enamel for painting your interior trim. Emerald Urethane Enamel will provide your trim and doors with a smooth and luxurious finish. This paint was created with a water-based, urethane-modified alkyd to look and feel like an oil finish. This is a paint that is perfect for areas that are frequently cleaned.
What does our Interior Warranty Cover?
Our interior paint warranty covers 100% of our workmanship as well as any fading, chipping, cracking or peeling. We are also happy to cover damage from things like kids, dogs, furniture etc. because we know life happens. Any issues you may have with your paint job we are here to help. We think it’s just the KIND thing to do!

We cover all labor and materials for any interior paint warranty. All you need to do is file a warranty claim and we’ll take care of the rest. All you need to do to file a claim is give our office a call and explain whatever issues you may be experiencing with your paint job. From there we’ll get your warranty scheduled and taken care of within 30 days.
Not All Paint Warranties Are the Same
When it comes to contractor’s house painting warranties, not all are created equal. It’s important to get your warranty in writing, and to make sure that you fully understand the terms and conditions of your warranty. Here are some questions you should make sure to ask about your warranty:
- How long is the warranty good for?
- What does it cover exactly?
- Does it cover workmanship only?
- What does the warranty define as a defect?
- Are materials and labor included?
Be sure to ask your painter these questions before making your decision to work with them or not. We’ve seen painting warranties from painters across the state and there is almost always some fine print or caveat that creates a riff in the warranty process.
Kind Home Painting Co. Interior Warranty
We hope that this helps you to understand our warranty options and what they cover, as well as our philosophy behind why we provide such an outstanding warranty. Your happiness and satisfaction is our top priority and we hope to be your painter for years to come 🙂
For more information, be sure to visit our Interior Painting page, and for inspiration head on over to our Instagram! You can also check out our parent company Kind Home Solutions for even more great content. Thanks for reading!
by Corey Morgan | Jul 20, 2022 | Exterior Painting, Paint Prep, Pro Tips
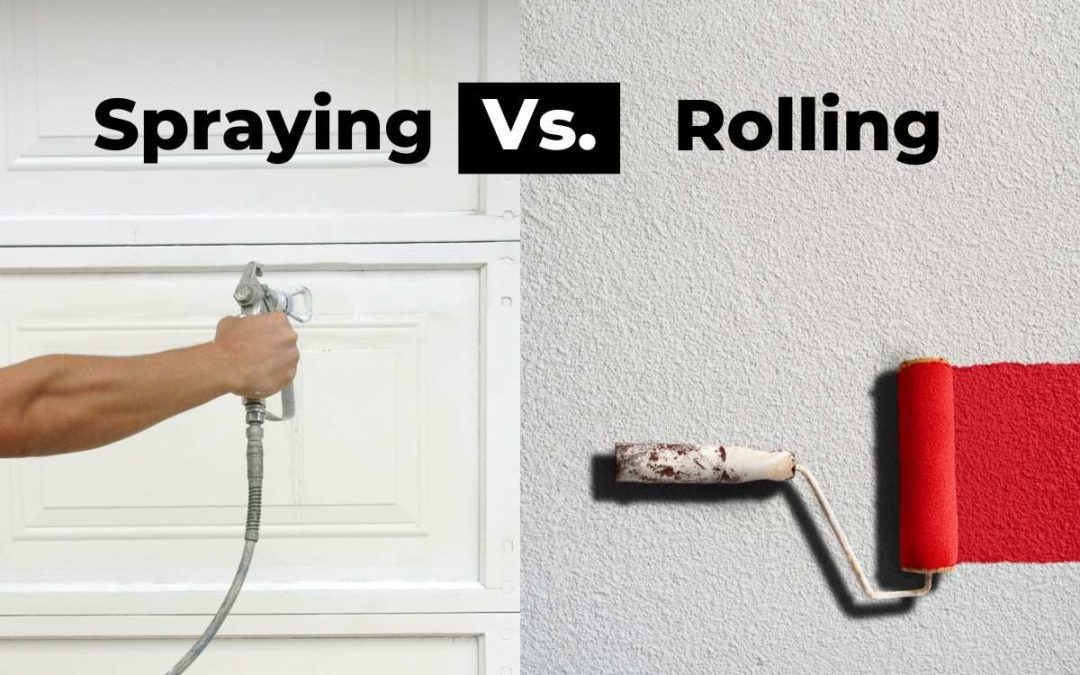
Is Spraying or Rolling Your Exterior Better?
The great painter debate – should you spray or roll exteriors? The answer might surprise you, because your home has a huge impact on whether you should spray or roll your home. This is a pretty controversial topic within the painting community, but we’re here to breakdown the question, is spraying or rolling your exterior better? Read on to learn the pros and cons of both exterior painting techniques.
Pros and Cons of Rolling Your Exterior
Paint rollers have been around since 1940 and Sherwin Williams was the first company to bring them to market. Rollers revolutionized the painting industry by speeding up the paint process and giving painters a better tool to cover larger surface areas. Nowadays, paint rollers come in a variety of sizes and thicknesses to help with any painting project; exterior or interior.
Pros of Rollers
- Great for large, smooth surfaces
- Cheaper than paint sprayers
- No brush marks
- Great for back-rolling to press paint into porous surfaces

Cons of Rollers
- Thin coats can be uneven
- Roller soaks up more paint so you use more product
- More expensive than brushes
- Rollers can’t be used for painting joints, corners, or smaller surfaces
Pros and Cons of Spraying Your Exterior
Paint sprayers and spray guns have actually been around longer than paint rollers. The first hand-held, air-powered paint spray gun was invented in 1907 and there have been many evolutions of that product since. We often find that clients who don’t like paint sprayers had a bad experience with them at some point. Paint sprayers from 30 years ago were quite different than the ones used today. Modern commercial paint sprayers have many benefits and have been optimized for residential and commercial use.
Pros of Sprayers
- Thicker, more even and uniform coats
- No paint waste as paint is not absorbed like with a roller
- Works well on uneven surfaces
- Faster and better application
- No brush or roller marks
Cons of Sprayer
- More expensive than rollers and brushes
- Need experience and practice using them to be effective
- Noisy compared to a roller
Exterior Painting – Spray vs Rolling
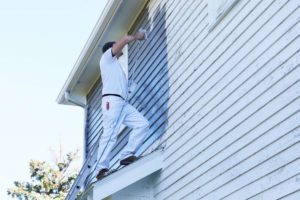
Now to the real question; which of these tools is better? Unfortunately, the answer isn’t so black and white. When it comes to our exteriors we tend to use a sprayer because it’s more efficient, offers better coverage, and gives a more professional finished quality. That being said, it’s important that your painter can utilize both of these tools because that’s what they are – paint tools. At the end of the day these tools can both be utilized to provide the best paint job. For example, if you are painting brick, stucco, or some other porous surface, you will want to use a sprayer to apply the paint and have another team member following with a roller to “back-roll” the paint in. Back-rolling helps to press the paint into the surface and get into those little nooks and crannies.
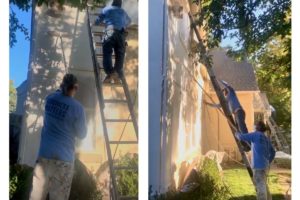
Kind Home Painters back-rolling the exterior of a Denver stucco home
For smoother surfaces like trim, wood, lap, vinyl, or metal siding, spraying is a much better tool to utilize because you won’t have any of those roller marks and you can angle the sprayer different ways to ensure you are getting full coverage on each board. Ultimately, one isn’t inherently good or bad. These are both great paint tools that should be utilized under different circumstances. To see some of the exterior paint projects we’ve sprayed and back-rolled, check out our gallery HERE. And for more inspiration for your next paint project, be sure to take a peak at our Instagram!
If you would like to get pricing for your project you can submit for a free estimate HERE.